
I'll start a new thread, just for the pipe question.
How to make a simple pipe, with an inside and an outside.
A pipe is basically two cylinders meshes with a surface connecting them.
![[http://img.photobucket.com/albums/v308/Echoness101/pipe.jpg]](http://img.photobucket.com/albums/v308/Echoness101/pipe.jpg "http://img.photobucket.com/albums/v308/Echoness101/pipe.jpg")
1-First, make a simple cylinder. This will be the outside of the pipe.
2-Now, copy and paste that cylinder. Click it and reduce its diameter while keeping mind of its proportions to the pipe's outside frame.
3- You notice that the inside cylinder has its texture on the wrong side. You fix this by, while having this cylinder selected, going to Curve > Matrix > Invert. If everything turned out alright, the texture is now seen on the pipe's insides.
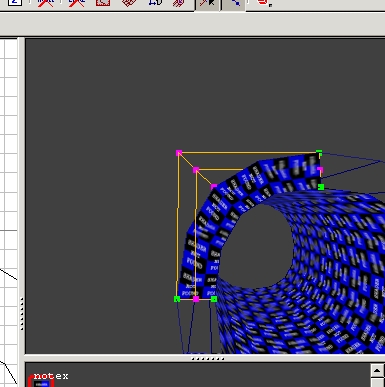
4- Now there is issure of the surface to connect the two cylinders at the pipe's ends. Make a small brush and turn it into a simple patch mesh (Curve > Simple Patch Mesh...) 3 rows and 3 columns should be fine (and probably ideal).
5. Bring it over to the pipe's end so that it can act as the surface. With this mesh selected , press 'V' key to go into vertex mode. You should notice that the mesh now has dots. These dots allow you to mold the mesh to your liking.
6. The trick is to mold the mesh to cover a quarter of the surface you need. When the vertexes are lined up nice, it cover a quarter of the pipe's end neatly. If you can't get it to fit, prehaps you need to work in a smaller grid (you can do this by hitting the number keys).
7. Now you go a quarter of the surface between the 2 cylinders done, you should notice you need to fill in the 3 remaining quarters. Select the mesh and copy it. With the new mesh selected, rotate it (the rotate features are the keys next to the save icon button). Repeat (see the image).
No longer a pipe dream, here's your pipe.
How to make a simple pipe, with an inside and an outside.
A pipe is basically two cylinders meshes with a surface connecting them.
1-First, make a simple cylinder. This will be the outside of the pipe.
2-Now, copy and paste that cylinder. Click it and reduce its diameter while keeping mind of its proportions to the pipe's outside frame.
3- You notice that the inside cylinder has its texture on the wrong side. You fix this by, while having this cylinder selected, going to Curve > Matrix > Invert. If everything turned out alright, the texture is now seen on the pipe's insides.
4- Now there is issure of the surface to connect the two cylinders at the pipe's ends. Make a small brush and turn it into a simple patch mesh (Curve > Simple Patch Mesh...) 3 rows and 3 columns should be fine (and probably ideal).
5. Bring it over to the pipe's end so that it can act as the surface. With this mesh selected , press 'V' key to go into vertex mode. You should notice that the mesh now has dots. These dots allow you to mold the mesh to your liking.
6. The trick is to mold the mesh to cover a quarter of the surface you need. When the vertexes are lined up nice, it cover a quarter of the pipe's end neatly. If you can't get it to fit, prehaps you need to work in a smaller grid (you can do this by hitting the number keys).
7. Now you go a quarter of the surface between the 2 cylinders done, you should notice you need to fill in the 3 remaining quarters. Select the mesh and copy it. With the new mesh selected, rotate it (the rotate features are the keys next to the save icon button). Repeat (see the image).
No longer a pipe dream, here's your pipe.
SnailIracing:n(500tpostshpereline)pants
-----------------------------@%
-----------------------------@%
![[http://i153.photobucket.com/albums/s202/BKTraitor/OMG.jpg]](http://i153.photobucket.com/albums/s202/BKTraitor/OMG.jpg "http://i153.photobucket.com/albums/s202/BKTraitor/OMG.jpg")
